 |
| More than a few weeds here! |
Flower gardens typically use cedar mulch. It comes in a variety of colours and allows water to seep through to the ground below. It can also define the edge of garden beds in an attractive way.
 |
| Black cedar mulch defines beds |
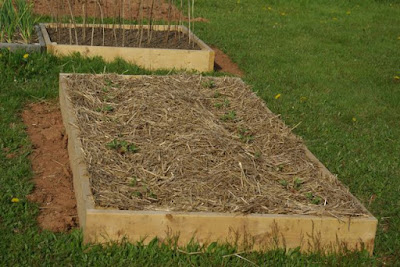
In my vegetable patch I have traditionally used straw to mulch my plants. Like cedar, it's an organic material that allows water to seep in, but unlike wood chips it breaks down quickly. This is actually a benefit as it can be left in place and adds nutrients and structure to the soil over time.
 |
| Strawberries mulched with straw |
This year, faced with a much larger garden space, I had to determine how best to combat weeds. Wood mulch is expensive and I find that straw itself often starts to sprout and weeds take hold. Given I was tearing up a piece of ground that was inhabited by goldenrod and thistles last year I figured I would try something a little different. Plastic.
Now I realize it's not organic, and it doesn't breakdown. Plastic can be detrimental to sea life, clog up landfills and we need to find ways to reduce using it altogether. These are all good reasons not to use it as mulch.
But on a small scale farm plastic can be used repeatedly if you're careful. It warms the soil in a way that other mulches can't. It completely blocks out weeds and provides a clean surface when your growing melons and squash.
After weighing the different factors I decided to try it as an experiment.
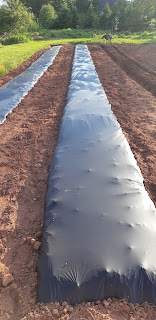
I didn't use just any plastic though. I found something called Bio Film. It's a 100% compostable, biodegradable film made from cornstarch. It looks like and acts like plastic in the garden. However, by the end of the season it starts to break down. What hasn't degraded can be tilled back into the soil, broken into smaller pieces and left to degrade completely.
I wasn't sure how to lay out such a large space and using plastic was actually quite useful to me for this task. Four foot wide plastic was easily laid out and tucked into the dirt creating clean rows.
I did find working with the BioFilm had some quirks. As it isn't really plastic at all it has different qualities. It's thin. You can put a finger through it without pushing too hard. You can see where there are rocks in the beds it stretched the film. I had to start removing as many rocks as possible to save my film. Strong weeds will actually push through the film and pop right through it so it doesn't create a perfect weed barrier.
You also can't direct seed with plastic. So some rows were bare and I used the plastic strictly where I was putting transplants. A quick cut with an exacto knife created the hole for the transplant. Sometimes the hole got a big stretched by my hands trying to dig plants in though.
 It worked though. I would absolutely use this film again. The black colour warmed the soil really well. Well enough that I grew watermelons for the first time this summer! Additionally my melons are clean as they are not sitting directly in dirt. Although I will admit some watermelons got so heavy they broke through the film just by their sheer weight.
A few holes have appeared in the film and weeds broke through in places but nothing so bad that I had a real problem. It will remain to be seen how well it breaks down in the ground over winter. I will keep you posted on its environmental impact.
In addition to the BioFilm I also tried a row of red plastic. This is a traditional plastic but the red colour supposedly boosts growth in tomato plants and increases your yield. If I'm careful this plastic can be used year after year.

What I did notice about the red plastic is that it promoted weeds. Too much light was able to seep through, unlike the black, and it created a greenhouse effect under the plastic. The weeds growing underneath literally lifted the plastic off the ground by 3 or 4 inches. I had to reach my hand in the plant holes and try to rip out the weeds underneath in a sweeping action. It was a giant pain and not something I particularly want to do again.
 |
| Attempting to weed UNDER the plastic! |
The other issue with plastic is watering. Generally when you're using plastic people use drip irrigation. There's no other way to get water to plants easily under that barrier. I couldn't afford that so decided to do things a little differently. Again, my garden is relatively small so I can get away with this. In a larger scale farm it would not work. I hand watered down each plant hole for much of the summer. This allowed me to check plants regularly for health. My husband said if we do this again we need to mark the holes with a stake as we couldn't find the holes by August! The other tool I used was water stakes. You can see pop bottles sticking out of the ground in the photo below.
Each pop bottle is attached to a plastic stake with holes drilled into it. You fill the pop bottle and it drains slowly into the stake and seeps into the ground. They are easy to see and fill and give a slow deep watering to plants. This little tool was my life saver this year.
If you're interested in the BioFilm I found it at Williams Dam Seeds, located in Ontario, Canada. Plant stakes are available through Lee Valley. I would recommend both. Happy Gardening Everyone. I hope you're having a great season wherever you may be.


.jpg)


.jpg)
.jpg)

.jpg)
.jpg)

