Saturday, March 31, 2012

Painting the Walls

When we decided to change the floor colour we also decided the white walls no longer made sense.  We wanted a colour that was more complimentary to the red and not quite so stark.  But we also had to keep in mind that the window trim and baseboards were now painted the same cream colour as the wainscot had been.

Thank goodness for the Personal Colour Viewer from Benjamin Moore.  We used this program once before when looking at colours for the outside of our house but now we put it to the test on the inside.

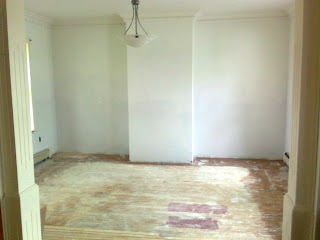
First we took a picture of the room after all the sanding had been completed.


Then we started to play.  We tried out various reds for the floor and tried to get a sense of what direction to go with the walls.  We started off with cool shades at first but that didn't feel right.

We tried a number of grays but they fell flat with us
Then we tried something bold.

Although this was very interesting it just wasn't right for me
Eventually we found this


The colour was Shelburne Buff and it was the clear winner.  A light colour, still bright so the room wouldn't be too dark and was the right tone to compliment both the red floor and the cream trim.  We decided to go straight to Benjamin Moore and purchase it so we would get this exact shade.

Here's the interesting thing we've found out about the Personal Colour Viewer


As we began painting the edges of the room the colour seemed awfully dark.  Much darker than the computer program had depicted it.  With more of a yellow undertone.

The final result was much darker than anticipated.

The wall that started everything.  This is where the original
shelves were located that I wanted vacated for the piano.
I'm actually thrilled with the way this looks.  As you can see it works well with both the trim and the floor but if we ever use the Personal Colour Viewer again we'll know that the true colour that comes out of the can is actually a darker shade than the program pictures it.

Wednesday, March 28, 2012

Painting a Hardwood Floor

The biggest question when we decided to paint our hardwood floor was what colour?

The floor that had been our inspiration for this step had been grey and initially that was the colour we were leaning toward.  However, before we made a final decision we decided to do some searching on the internet to see examples of other colours.  The grey floor in the photo below was very attractive.

Picture from Cozette Coffman
We found numerous examples of floors in this shade, sometimes with a hint of green or blue to them that we greatly admired.  But as I googled further and further I came across a forum discussing how to paint a wood floor and someone on that forum posted photos of a floor they had done.  And it was red.

I am the type of person that, when I make up my mind, there's no changing it.  I wanted that red floor the instant I saw it.  Jody didn't stand a chance.

Oh he tried.  Red is hard to work with other colours.  If we don't like it there's no hiding it.  But it had to be red.  Dark red in fact, the darker the better.

The man knows when he's beat so off we went to the paint store.  We wanted a paint that was hard wearing, didn't have too much gloss and could be washed frequently.  That was a bit difficult to find.  Employees at the hardware store were baffled.  They had deck paint but who would paint their living room floor?  I hadn't realized this wasn't a common thing to do.  After a bit of searching we found a floor paint (so the canister said) and then worked on finding the right shade.


By mistake, both of us ended up purchasing a can of paint.  In two different shades of red.  One a dark cranberry colour and one with a more orange tone.  Since we had two cans anyway we decided to test them on the floor.  Thank goodness we did this first because to our surprise we found that the water stains below the paint almost immediately began to emerge through the colour creating a white film on the floor.  That water damage was still creating a problem after all these years.

A solution was easy though.  We would buy a can of undercoat that would form a barrier between the boards and the paint.  Tint it red and no one would be the wiser.  Except this happened.


The sales rep had assured us that red tints always looked pink and we weren't to worry.  But this was seriously PINK!  We were substantially worried and with good reason.  After the first coat of red paint the floor looked like this.


That was NOT the colour I wanted.  The pink undertone was combining with the red to make this hideous ultra bright fuschia hybrid.  Let that be a warning to all you folks who plan on painting something red in the future.  Do not use a pink undercoat no matter what the sales rep tells you.  Holley Garden at Roses and Other Gardening Joys later advised me that grey is the appropriate colour to undercoat red.  I wouldn't have guessed that but after this experience I would definitely use grey in future.

So what were we to do?  Well, we had two cans of paint so we went to town with it.  We painted, and painted and painted.  With each new coat of paint the pink receded just a little bit more. Even though the two cans were different colours we didn't care, as long as the floor wasn't pink anymore.

The good news is it worked.  Eventually the pink receded and only a red floor remained.  The bad news, it was sticky.  Very very sticky.  For months after the fact that floor would not cure.  Humidity was one of the culprits but 4, or was it 5?, coats of paint was also to blame.  It was months before we could safely set foot in the room without our socks sticking to the floor boards.

I was so very happy though.  We were exceptionally fortunate that the colours combined well and the final result was exactly what I was looking for.


We had managed to save our original hardwood floor and it was a brilliant shade of deep red.

Tuesday, March 27, 2012

Saving a Hardwood Floor

Once the wainscot was removed from the piano room we found ourselves starting the renovation again from scratch.  This time we decided to start from the bottom up and began with the floor.

The floor had always been an issue but we had been choosing to ignore it up to this point so I guess it was a good thing that we were forced to do something about it.  If we go back to the original photo of this room you will notice there is a large carpet that has been cut to exactly fit the room, with a one foot border around the perimeter.

Carpeting was custom cut to fit the room
When we first saw this room we were very excited, believing we could pull up the carpet and expose the original hardwood floor underneath.

However, when we pulled the carpet up we found this.


The good news is that it is the original floor.  The boards are narrow, free of knots and very long.  It also has the worn and rolling contours that only years of foot traffic can provide to a floor like this.  The bad news is it had some major problems.

The first issue was that only the perimeter of the floor had been stained.  If we wanted the floor a uniform colour we would have to sand the whole thing and then stain it again.  The second issue was there was a reason the whole floor had not been stained.  When this house had sat vacant for many years there had been water damage and this floor was part of that damage.  Large water spots were visible across the room and numerous boards were actually rotten.  A simple sanding was not going to fix these problems.  To make matters worse the carpet that had been laid down to hide these issues was a real carpet.  Not a rug.  Carpeting has foam backing that provides an extra layer of comfort when fixed to a floor.  However, in this case the carpet was sitting loosely on the floor and had been there many years.  The foam backing had begun to break down and was actually stuck to the floor boards.

Foam from the carpet backing had to be scraped by hand off the hardwood
Our first impression wasn't good.  The floor was not in great condition and required plenty of work to make it usable.  It needed cleaning and sanding.  Rotting boards would have to be replaced.  A new finish would have to be found.  We weren't sure this was the answer.  Floors throughout the house needed replacement and we considered simply ripping this wood out and putting in new floors throughout.  We had some tough questions to answer about what we wanted the house to look like, if we wanted to save this original feature, and what the changes might cost.   A new floor would solve some problems throughout the house but it would also mean losing something we prized, an original hardwood floor.

When looking at homes to buy we had viewed another farmhouse that had painted softwood floors.  We had greatly admired those floors and wondered if we could do the same.  It would cover up the water stains and replacement boards and would add a dash of colour to the room.  If we didn't like the results we could always rip the floor out completely.  We decided to paint.

The first step to prepare the floor was scraping off the bits of foam from the carpeting.  We spent hours with small scrapers completing this job.  Next the rotted boards had to be removed.  This wasn't an easy task to accomplish but luckily Jody is pretty handy with tools and knows a thing or two when it comes to wood.  

You can see where the new boards are in the lower portion of the photo
Individual boards were cut and pried out of the floor.  Then custom cut boards were fitted into the open spaces.  The new boards were very visible when seen next to the old boards.  A simple stain would never have disguised them so paint was a good solution to this issue.  Once the new boards were installed the entire floor was sanded.  This was necessary to remove the stain in preparation for painting but it was also necessary as the newly fitted floorboards literally stuck out from the old boards.  You could feel their newly cut corners with your feet when compared to the smooth contours of the old floor so extra effort was made to sand those edges down.

Then finally we were ready for paint.

Saturday, March 24, 2012

Humidity and our House

In a way I'm glad we're so slow about renovating because it's given us a lot of time to think about the changes that we want to make.  Whether some of these changes are really necessary, if our first inclination was really the best choice and which issues take priority.  By taking our time we have allowed ourselves to get used to this house and its quirks and get a sense of how we use the space.

One of the quirks we discovered was how our house reacts to humidity.  I thought I knew something about humidity when we lived on the west coast but I really had no idea.  That first summer living on the east coast was a shocker.  The temperatures soared and the air closed in and all of the sudden I felt like I couldn't breath.  Not only was my body responding to the different weather, our house was reacting similarly.  All that dry woodwork just sucks up the moisture like a sponge and it expands.  If space isn't left for expansion when woodwork is installed it can be problematic.  We discovered this when our lovely new painted wainscot in the piano room started to buckle right off the wall.  The fresh paint cracked and the boards warped.

One of the first things people notice in this house is how much woodwork there is
Once the high point of summer passed so did the humidity but the cracks remained.  It was obvious that it wasn't worth fixing either.  Each summer the humidity would rise and the boards would move causing further damage.  The paint only emphasized how much damage was being done.  As much as I liked the wainscot I had to concede it really wasn't worth repairing.  It wasn't a priceless antique and the constant movement meant ongoing damage.  And thus we ripped it down.

The wainscot was actually sheets of wood glued to the wall. 
And now here we were once again, back at square one.  The room was unfinished and the white walls appeared quite stark on their own without the contrasting cream colour to offset them.  What would we do next?

Starting over from scratch

Thursday, March 22, 2012

Is My House Historic?

When we bought our home we were completely taken in by its century old charm.  The peaked roof, the intricate shingling, bay windows complete with stained glass.  But there were other benefits too.  We had looked at A LOT of other houses and the condition of those left a lot to be desired.  Crumbling foundations, asbestos tiles, leaky windows and lack of insulation were all issues we encountered.  As much as we loved these old houses we also knew that as first time home owners we needed to be careful with what we decided to take on.  We didn't have the finances or the knowledge needed to completely rebuild a house.  What we were looking for was a house that had already had some work done and was livable.  And that was one of the reasons why our home was such a great find for us.

Our house dates back to 1880 or 1890
Our house was renovated as recently as 1980.  New plumbing, windows, electrical and insulation had all been installed.  There was a cement foundation and a proper heating system.  We were ecstatic.  There were some issues with maintenance that needed to be addressed but we felt we would be able to move in and live here with relative ease while any work took place.

But it's hard when you are looking at multiple houses to purchase and only have a couple of hours to remember the details just right.  You can't poke and pry too much during that limited viewing time to find out if that light fixture is glass or plastic.  It's not until after you have move in that you really start getting to know your home.  What we began to realize was that the century old details we thought we were getting weren't necessarily authentic.

This molding is quite attractive but likely isn't original
Houses that stand for a hundred years have some stories to tell.  One of those stories is renovations.  Each time a family moves in their needs change and they tend to change the house to fit those needs.  Over a period of 100 years that can mean a lot of changes.  Not to mention passing styles and the introduction of indoor plumbing and electricity.

And so we discovered one of the secrets about a historical house.  It's rare that they come to you intact from the day they were built.  Our property at one time was a working farm that had several barns and a massive apple orchard.  Some old stones in the hedgerow and approximately 20 apple trees are all that is left of those times.  The house itself, we learned, had been abandoned at one period of time.  During this period it was looted, vandalized, had structural and water damage.  In order to make it livable again extensive renovations were completed.  We realized that those renovations that made the house so livable to us had also been the demise of many original elements. 

This molding does appear to be antique
It was a bit of a let down when we realized that many of the details we admired weren't authentic.  But it was also liberating.  True historic houses have a lot of rules that go along with them.  Communities generally regulate what can and cannot be done to these home in order to preserve their original state.  Our house was entirely up to us.  We could try to replicate the antique age of the house or make it completely modern.  Instead of questioning every detail we started to loosen up and think about the house in terms of what suited us and our style.  And that has led to some interesting choices.

Tuesday, March 20, 2012

Note to Self

I must remember that I don't drive a truck anymore


And that small cars don't take kindly to mud

Sunday, March 18, 2012

Spring has Sprung? Possibly...

Even though it was snowing and the plow was clearing our driveway just a couple days ago, today it felt truly like spring.  I shred several layers of clothing and made my way out into a sun kissed yard to enjoy the receding snow and see if I could spot signs of the season to come.

Behind the house on the south side the snow has all but disappeared.


Making it an ideal spot for crows to dig for their next meal


As lovely as it looks though it's far from ideal.  Muck boots were absolutely necessary for today's walk as it's now officially mud season, as seen in our driveway.


Pussycats that dislike getting their toes wet were having difficulty with the conditions.


But managed to find a way to enjoy the fresh air without getting too dirty.


I found plenty of buds on trees and shrubs like this lilac


But nothing is quite ready to burst open just yet.

There aren't any spring bulbs to sigh over 


we'll have to wait for blooms for awhile but I did spy a hint of growth


Up against the warmth of the foundation the bleeding hearts are beginning to push through the earth.  Spring really is coming.


Saturday, March 17, 2012

Painting the Wainscot


White is an easy colour choice to make when painting.  It's a good backdrop for furniture, it mixes well with other colours.  It's neutral and palette cleansing.  White walls can allow you to draw attention to other features in a room.  We painted our piano room white at first.  I make the choice sound profound now but really I think there was just some extra paint in the basement that sealed the deal for us.

I thought white would contrast well with all the dark wood work in this room.  The wood made everything appear much darker and smaller than this room really was.  The light colour in contrast I felt would brighten the room up and show it off.  Although we didn't stick with white I'm glad we did this first because it gave me a chance to see the room, not as the previous owner decorated it, but in a more neutral manner and assess it's positive and negative points.  One of the details that came to light was the extra band of wood several inches above the wainscot.  This had been used to create an accent colour on the walls but once again, this wasn't an original detail and it wasn't one we were keen on.  Goodbye rail!

The top rail was removed so only the wainscot was left.
It was about this point that differences in opinion arose.  Wainscot is something that really appeals to me.  I love that look of paneled walls but hubby was not impressed.  He pointed out that, once again, it wasn't original!  How could that be?  What the heck was original in this house anyway?  The boards as you can clearly see in the above photo were short.  In traditional construction that would never have happened.  We use short boards today because we are more careful about our wood consumption and use as much of a tree as possible.  In traditional construction only perfect boards would have been used.  They had a surplus of wood a hundred years ago when north america was still overflowing with resources.  Using wood that wasn't the correct size or had knots in it was unheard of.  Imperfect wood went straight into the fire.  Despite the arguments I was still reluctant to see this go so a compromise was made.  We painted it.


A dark cream colour to offset the bright white above.  And it looked pretty darn good I think.  The short boards and the knots were no longer as noticeable.  The room now looked bright and cheery and appeared considerably larger to the eye than it had with the dark greens and browns of before.


And at that point we declared the room 'finished' for a time.  At least until summer and humidity came calling.

Sunday, March 11, 2012

Renovation Realities

I have been intending to talk about our house renovations for some time now but I keep putting it off because the truth of the matter is, they aren't exactly moving along at a fast pace.  I wanted to be able to do some awe inspiring before and after shots of my smashing newly renovated farmhouse shortly after moving in but instead we have been limping along barely completing even a single room after two years time.  So I finally decided that the truth is the best story to share.  Although it may be a little ugly at times and fraught with bumps along the way.

With that in mind let me introduce you to our large living room or the piano room as we like to call it.  Although the piano isn't even located in there at this point.


This is what the room looked like the day we moved in.  Luckily I had the forethought to ask hubby to photograph the entire house before we put a single box in the door.  I knew some changes would eventually occur and I wanted photographic evidence of what it looked like before we got our hands on it.

You can see it's a large room with some nice light.  Two windows on each side of the room, one set facing north and the other set south.  Incidentally this is the room where I do my seed starting as it has plenty of good light and lots of space.

We didn't anticipate renovating this room right away (famous last words) but I decided this was the room my piano would live in as it was so spacious.  Pianos are best kept on an inside wall to keep them from temperature fluctuations and the only inside walls available had shelving on them.  So the shelving was removed and we found this.


Turns out the room had been painted green AFTER the shelving was installed (however did they manage that?) and now we had some lovely white stripes to contend with.  In all honesty the green wasn't to our liking anyway so our very first step was painting.


A good plan it turned out as we made yet another discovery.  Those framed mirrors you see in the first photo - we took them down and found they weren't really framed at all.  The mirror and the frame were hung separately and the wall space between them was painted.  From a distance you couldn't tell but when we removed the pieces we were left with large rectangular green patches on the wall.  Unfortunately we forgot to get pictures of that but if you look closely at the photo above you can tell where hubby had to do some extra priming to try and cover it up.

While I concerned myself with paint colours hubby had other things on his mind.  The 'abacus', as it became known, that hung over the entrance to this room was irritating him to no end.  As was the fireplace mantle.  Jody designs and creates furniture and works regularly with wood so these items immediately drew his attention as he  knew they were not authentic.  Our house dates back to 1880 - 1890 but has had extensive renovations in the past.  In this case someone had attempted to create pieces reminiscent of antique fixtures but 'faking' an antique well takes some skill and knowledge.  Although it was a minor thing it was decided these fixtures would be removed.

With the removal of the mantle we had yet another issue on our hands.  Despite the fact that there was no obvious fireplace there is actually a chimney behind that wall.  We briefly considered adding a proper fireplace to this room however our home inspector notified us that you cannot have two heating fixtures coming from one chimney.  In fact our insurance would become null and void if we had a fire!  The wood furnace that heats our house connects to this chimney in the basement so the hole on the main floor would have to be blocked.   $100 and some weeks later we finally found a mason to do the job.

We were so giddy with that job done we decided to leave our mark on this house permanently.


Patch up the drywall and add a few coats of paint and the room would be finished we thought.  Oh yes, did I mention we started this renovation in November of 2009?  Perhaps we might have been wrong.

Wednesday, March 7, 2012

When to Prune Apple Trees

Even though it is mid-winter there really is no time you can forget about your apple trees.  This is the perfect time of year to get outside and get pruning.

Last year we did our first pruning in the orchard.  Once again this year we decided to prune off lower limbs from the trees to make it easier to cut the grass beneath them.  There are a lot of weeds in and around our orchard and if we don't get in to trim what's on the ground it can sometimes threaten to take over.

This is what the orchard looked like when we first bought the property
Climbing nightshade is a problem for us and we need to keep those vines from growing and climbing up into the apple trees.  We also like to keep things trim for apple picking season in the fall.  It can become quite a headache trying to find apples in amongst the weeds on the ground.

Despite our best efforts the wind always takes down fruit for us.
So more low hanging branches were removed this year but we also did a little spacing of branches.  In some places the branches are so thick that it's hard for air and sun to reach inside and get to the leaves and fruit that need it.  

This waterfall of blooms was gorgeous in spring but the
branches needed to be thinned so fruit has more breathing room.
At this time of year it is easy to view the branches themselves without their green cloak and see any irregularities that might otherwise be missed. 

Numerous lower branches were removed right at
the trunk (*can you spot the mistake?*)
Before removing any branches it is important to follow the branch along its length.  Start where the branch grows out from the trunk and follow along to see where it crosses other branches or perhaps parallels them.  Some branches might appear dead toward the interior of the tree but sport lush growth at their tips.  You can see if the branch is thick or thin.  Does it look like a strong branch that would support a load of fruit or is it small and weak?  The number of buds will also be apparent giving you an idea of the branches health.  By viewing the branches as a whole you also get a sense of the structure of the tree.  

We cut back a number of branches as you can see from the debris littering the ground of the orchard.


Our main goal this year was creating some breathing room on trees that were overly crowded.  While last year we used a chainsaw and removed some major branches this year we used only a handsaw and loppers as we were working on smaller limbs in the interior of the trees.  


* When cutting branches back to the trunk you should make sure to cut them just outside the branch collar where the branch connects to the trunk.  It takes more time for a tree to seal the wound on a long stub than one that is flush with the collar.  In the picture above you can see where that wasn't done.  I'll obviously need to go back and check our work!


Saturday, March 3, 2012

Tools for Apple Picking

As mentioned earlier, I never have time during apple season to write about apples but now in the dead of winter I am catching up on 'apple posts'.

One of the big questions when the apples ripen in the fall is how to get our hands on them and get them into the house.  After two seasons in the orchard we have now collected an assortment of tools to help with the apple harvest.

A trusty ladder or two is an absolute must with these old heritage trees.  Unlike new varieties that are grafted on to much smaller rootstock these old trees can grow up to heights of 30 feet and much of the best fruit is located in the sun right at the very top.


We have two different ladders which you can see above.  One obviously is rather small at 6 feet high but the benefits are you can easily carry it around and the red colour means you never forget where you put it last!  Not all fruit is located at the very top of the trees either so having a mid-sized ladder helps to access fruit lower down on a tree.

The second ladder is 17 feet when fully extended and has the benefit of a wide base which is very sturdy, and a very narrow top, which fits easily between branches.  Although it can be difficult to maneuver into place sometimes the benefits definitely outweigh the negatives.  This ladder does not tip easily and allows you to squeeze into spots that would otherwise be inaccessible.

You can clearly see how wide the base is compared to the top
Even a large ladder sometimes isn't even large enough though.  Standing on top of a 17 foot ladder means you still only reach around 22 or 23 feet.  If the tree is 30 feet tall there's still 7 feet of fruit you can't reach.

In cases like that our handiest tool is the apple picker


This very simple tool consists of metal 'fingers' that grab at the fruit pulling it into a cotton bag.  By mounting it on a long pole you can increase your fruit picking reach by several feet.  


As you can see in the above photo the picker allows me to reach up to almost double my height.  By standing on a ladder and using this picker we are able to reach fruit right around the tops of the trees.

Also important when picking apples is having a place to store them while working.  Having a bag that you can hang around your neck or across your chest is absolutely necessary, especially if you're high up on a ladder.


We use a variety of old shoulder bags or the green mesh bag in the photo above for this purpose.

And then when the bags are full we end up using every available bin to hold apples for sorting and storing.

Trugs are one of my favourite garden bins

What do you use an old wooden apple box for?  Apples of course!