Monday, November 29, 2010

My Favourite Plant

Fer from My Little Garden in Japan suggested a blog carnival this month.  The topic, it was decided, would be our favourite plant.

How exciting, sharing a plant that others might not know, that I love.  But what would that plant be?  How can I possibly pick a favourite!  There are so many plants and they all have so many uses and their particular place within my garden and my heart.  Would it be a spring flower, heralding the new gardening year to come?  or the brilliant blooms of summer basking in the heat?  The trees providing shelter or the shrubs that provide the backdrop to the glowing colours of perennials?  I took a look through some old photos for ideas and it turned out to be a trip down memory lane, looking at flowers of bygone gardens, it made me happy and sad and reminded me of how my gardening experience has grown over the past years.

My favourite plant it turns out is not something that is new and unknown, not exotic or sought after but something more personal.  It is the simple and rather common Forget-Me-Not, or Myosotis alpestris.


Many people aren't terrible fond of this little flower or simply don't find it all that interesting.  It can be found just about anywhere, will grow anywhere, self seeds readily and frequently all over the place.  In fact, if you grow it you might find that it invades your garden in every nook and cranny.

For an experienced gardener this plant may not seem exciting but for a beginner, there is no greater flower.  When I began to garden for myself, not so many years ago, I was looking for plants that liked shade and were easy to cultivate.  I wanted to start my own seeds and after searching catalogues these delightful blue flowers fit the bill.  The seeds cost very little and they germinated with almost no work.  Despite the fact that I planted them too thickly and didn't thin them, and that I lacked proper lighting, these little seeds thrived and introduced me to the wonder of growing a plant from seed.  Taking a tiny speck and watching it become a plant with leaves and flowers.  These little flowers gave me the courage to try other seeds and when the others didn't work I still took heart that I was able to grow something.  When they were transferred to the great outdoors I worried over them but it wasn't necessary.  Just a scrap of dirt and a small amount of light and these plants expanded considerably.  No flowers that first year but I was awarded by masses of blooms the following year.  Blue blue blue, how could you not love that bright bright blue.


Not only did these plants flower with abandon they also tossed their seeds around on the wind.  And the next year I was rewarded with the soft fuzzy leaves of forget-me-nots popping up in corners that I wouldn't have otherwise thought would support them.  Throughout my years of shade gardening the forget-me-nots were always there, carpeting the ground with their soft leaves, sprinkling the ground with blue.  A constant delight each spring providing a background to the late blooming bulbs and paving the way for other summer plants to take hold.


Can you see the forget-me-nots in the above photo providing a backdrop to these lovely pink Woodland Hyacinth (Hyacinthoides hispanica)?

The flowers of forget-me-nots are tiny, almost insignificant but massed their colour is eye catching and their ease of growth helped pave the way for me to spread my wings and become comfortable in my gardening abilities.  This past summer while my mother visited she cleaned out an old planter in front of the house.  Once the weeds were pulled we mulled over what to put inside.  Mom asked if I had any seeds and sure enough, there was a packet of forget-me-nots.  Within weeks the little seeds had pushed through the ground and formed plants.  I look forward this year to spring when I'll continue to have my little blue flowers to remind me of past gardens and all that I've learned and will continue to learn in my garden.


Thank you to fer for suggesting this post and taking me down memory lane :)


Sunday, November 28, 2010

Cleaning the Roses

The weather this weekend was sunny and clear and the snow even melted back so rather than stay indoors and clean the bathroom I decided to do some yard work.  There's one chore I've been putting off throughout the summer.  Cleaning out the rose bushes.  During the early summer our roses looked like this.


Large shrubs full of dark pink roses, they are really quite lovely but also severely overgrown.  The worst part is that they are harbouring wild raspberry canes.


If you look at the top of this photo you'll notice the curly canes sticking out of the bush.  Those are wild raspberry canes.  It's a lot easier to see them now that the leaves have fallen so it was a good time to get in there and do some pruning.  The raspberries are easy to identify as the canes are a bright brown and lack the large thorns of the roses.

Can you spot the raspberry canes among the roses?
But what to cut the canes with?  The reason they've probably taken hold there is it's impossible to get into the rose bushes without scratching ones body parts to pieces.  I need something with a long handle.  oh no, here we go again, another tool from that store that shalt not be named.  I seem to be obsessing about tools lately.


This handy thing is a raspberry cane cutter.  How perfect.  It has a telescoping handle for getting into hard to reach places and has a hooked blade on the end. (my apologies for the slightly fuzzy photo)

Just hook the blade around the cane and give it a good swift tug.


An hour later I had a pile of raspberry canes and a much nicer looking bunch of roses.  There's still plenty of work to be done pruning roses but that can be done in the spring.  I'm just happy I finally got around to this job as I've been putting it off for so long.  Who would have thought I'd be here at the end of November cleaning out rose bushes!  Just proves there's always something that can be done in the garden.

Thursday, November 25, 2010

Oh the weather outside is frightful..

What to do when the weather isn't cooperating?  Well for me that means cleaning out the garage.  Nothing worse than itching to get to work in the spring and not being able to find your tools, so I'm taking this time now to tidy up and prepare myself.  After all you wouldn't want to find this when you opened up the garage in the spring.


To avoid that possibly unpleasant experience I took it upon myself recently to do some clean up.  Some of the work was completed earlier on.  I spent an afternoon in October washing out all my pots and stacking them neatly.  They'll come in handy for next spring's perennial sale when the neighbourhood starts planting up donations.  Then when the frosts began the hose was emptied of water and rolled up.    I've killed a few hoses in my lifetime, as well as pipes, so I knew better than to tempt fate.  In addition to moving the hose into the house the water tap was also turned off inside the house.

The garage obviously needed some tidying up to start with.  Empty manure bags went into the garbage, empty and non smelly mulch bags were saved for further use.  Seed propagation supplies were brought into the house for easy access as I will need them in early spring.   Garden accessories, like my crows were brought in to keep from rusting and disintegrating.


The potting bench was given a general tidying up.  Dirt was swept off, items were neatly piled.  Some nails were pounded into the wall so that more tools, that have been accumulated over the season, could be hung up.

Most importantly though my tools were cleaned.  I mean, of course I always clean my tools before I put them back!  um, who put this dirty old shovel back in the garage without cleaning it!?


Okay, so there are times when I'm not terribly organized or clean and things get thrown in and forgotten about.  This is the time to make up for it so I'm able to start fresh in the spring.  I pulled out my tools for the job.


The first item is a stiff brush.  This is actually meant to clean pots, which it is good for, but I also find it useful for scraping off hardened dirt from shovels.  Some tough bits require something harder to knock the clay loose but generally the brush does the job.  After a good brushing I give it a wipe with a cloth rag.  For many tools that's enough but every once in awhile I find some rust under all that dirt.  Putting away tools wet or with wet dirt clinging to them sometimes means they get a bit rusty.  To help clean them up I use my rust erasers.  Purchased at Lee Valley (yup, here we go again.  We should play a game of 'spot the Lee Valley tool') these small blocks have a rubbery texture but act like sandpaper.  They easily scrape away at spots on your tools and help with the job of clean up.


That shovel looks much better now.  (I realize the shovel is still pretty rusty but this an old second hand shovel and I'm not willing to scour the entire thing)  This was a handy exercise because many of my tools this year were inherited with the house purchase.  Cleaning them up made me take a close look and I discovered cracks in two shovels.  It also reminded me that my pruners needed sharpening and that the snow shovel needed to come up to the house.  Now I won't spend a lot of time next spring running around trying to find the tool for the job.  I can just dive right in and get to work.

Sunday, November 21, 2010

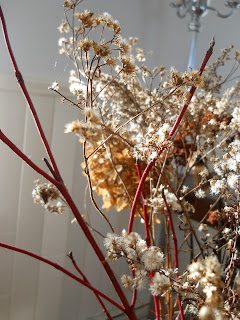
November Monthly Garden Bouquet

By now the garden is completely done for the year.  Frosts have become more and more frequent and then on Saturday the snow came.  Now that winter is here, what to find for a bouquet?


Last week while the ground was still bare I stole into the yard and picked the remaining flower heads.  None of them alive anymore but still just as pretty.


Hydrangea blooms that were once white are now dried to perfection by the cool temperatures and fall winds.

The flowers of sedum have dried and slowly opened to reveal their seeds.


Fluffy seedheads of goldenrod (above) and ligularia (below)


And finally for a twist of colour, I've included a few stems of red osier dogwood.


This bouquet will quite possibly last me months, bringing a dash of autumn into the house, reminding me of all the wonders that will come again next spring.  quite possibly one of my favourite bouquets thus far.

To see more beautiful monthly bouquets, please visit Noelle at Ramblings from a Desert Garden.

Saturday, November 20, 2010

Bon hiver! *

Ready or not, here it comes.


* Bon hiver is a traditional french greeting.  Directly translated, it means, Good Winter.  It is often used for the day the first snowfall sticks to the ground.

Thursday, November 18, 2010

The War Against Bindweed

When you purchase a new home there is only so much time to take in the details of the house and property.  The aspects you love will jump out at you and probably a few things that need fixing.  But there are many things that you don't notice at all.  And I definitely didn't notice that bindweed was thriving all around our property.

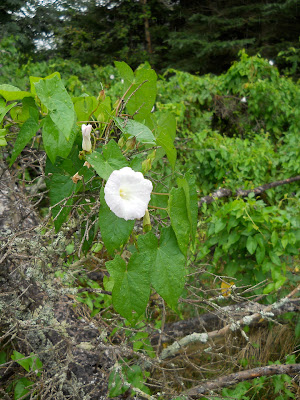
I've seen bindweed before but I've never had a problem with it in my garden.  Well, it seems my time has come.  For those of you who aren't familiar, let me introduce you to Bindweed, or Convolvulus.  Bindweed has a couple of forms including Field Bindweed and Hedge Bindweed.  For all intents and purposes they are essentially the same thing, with one being slightly larger than the other.  Bindweed is a perennial vine closely resembling a morning glory.  The plants creep along the ground pulling themselves up any plant that will support them, sending twining stems around and around.  Eventually they form dense mats around other plants that choke and suffocate them to their demise.  The flowers tend to be white or pink and the leaves are triangular or arrow shaped.
Bindweed blooms look like morning glory and have distinctive arrow shaped leaves.
This invasive weed was introduced from Europe and has spread rapidly throughout North America.  It spreads via long lasting seeds that can remain dormant for up to 20 years and also by thick rhizomes.  The rhizomes contain buds along their length that can turn into shoots when they break away from the main root.  Bindweed rhizomes are extremely brittle and break easily so it can be a tricky situation as each portion of the root that is broken away can transform itself into a whole new plant.

I'm not a big weeder by nature.  I love all plants and often weeds are extremely beneficial to insects and other wildlife.  I'm also lazy.  So weeds tend to be a normal part of my garden.  But in this case I'm seriously against bindweed.  It is incredibly destructive to other plants, forming great mats and preventing air and sunlight from penetrating the plants laying underneath this vine.  Recently I've been even more rattled by the fact that this insufferable beast of a weed is trying to make itself at home in my compost bin.  The bin is located next to the hedgerow, which I didn't realize until too late, has bindweed growing though it.  Over the course of the summer the bindweed tried to cross from the hedge and twine itself around my bin.  Frustrated I cut a one foot swath around the bin and I regularly go in and pull the vine to thwart its attempts to make itself at home.

But I hadn't thought about the fact that bindweed spreads by roots.  Recently we've had a spell of warmish weather and I decided to work at cleaning up a compost pile started last winter.  It's in the same location as my compost bin, next to the hedge.  And over the course of the summer the weeds have practically been jumping out of the hedgerow and clambering onto that luscious compost.  That includes the bindweed which I've been hand pulling off the top of the pile.  So I began the work scooping up this compost and placing it in beds when to my horror I found this.


As I dug through the pile I began to find huge pieces of bindweed roots.  Not only had the plant tried to jump on top of the pile but it also sent its roots out underneath it.  There's a mass of roots hiding in my compost pile!  The pile has been a slow compost and not hot so the roots have survived quite happily there.  Although frankly I wouldn't even trust bindweed in a hot compost.  This stuff is just too prolific to take a chance.  Now some people might have said to heck with it and abandoned the compost but it's a prescious commodity around here and the fact is that no matter where I put the compost the bindweed will go with it.  The best course is to remove the offending plant and its roots.  So I've been spending rather copious amounts of time lately sifting compost, shovelful by shovelful, and pulling out the roots of bindweed as I go. 

The good news is that the roots are pretty hard to miss.  Once you've seen them you'll always know.  They can get to be as thick as a pencil and are a bright white.  Their most distinguishing characteristic has got to be how brittle they are.  They snap instead of bending.  Of course this means you have to be careful to not break them and be very very careful to pick out each and every piece.  I think I did a pretty good job of sifting but I'll be keeping a close eye on my compost in spring to see if any plants spring up.

 The above pile of roots has been placed in a brown bag in the garage where they will dry out over the winter and hopefully die before being taken off to the garbage where they belong.

Saturday, November 13, 2010

Managing an Apple Orchard

As the weather has gotten colder we've still been working away, busy as bees, here at the Corner.  The source of all this activity is the apple orchard.  Never did I think when we bought this place that a few apple trees would occupy me for 3 months at a time.  Of course, I didn't count exactly how many apple trees came with the house.


The work began back in late July when Jody cleared the weeds out of the orchard.  Climbing nightshade have taken over in there and requires vigilance to keep it at bay.

From there we began thinning apples.  Apple trees tend to produce many many little apples.  The trick to getting larger fruit is to thin your apple crop.  When we came upon a clump of say 5 apples growing together, we would pull approximately 3 of them off the tree, leaving 2 behind.  Those 2 apples will receive all the nutrition that the original 5 would have received and grow into larger apples.

At the end of August our first apples matured.  There seemed to be a large amount of apples that had fallen under one particular tree so we began taste testing.  Happily we discovered this tree is a Yellow Transparent, otherwise known as an August Apple.  It produces soft yellow apples with a tart flavour.  How did we know what kind of apple it was?  We considered that the trees in our orchard were likely planted around the time this house was built.  Basically some time in the last 100 years.  You won't find these apples at your local supermarket so we needed to find a source that listed heritage varieties.  AppleManFarms lists heritage varieties and talks about varieties that are common in the maritimes and was a big help to us.  We still haven't been able to identify all the varieties on our property but we're getting there.  Identification requires a lot of items to be addressed.  The size, shape, taste and colour of the apples are important.  But other qualities such as bloom time and tree shape are considered as well.  In the coming year I hope to more carefully document each of our trees so we'll be that much closer to a positive identification.
These apples ripened in late October and were extremely tasty.  Unfortunately we haven't been able to identify them.
Now in November there are still a few apples hanging on in our trees although most have fallen or been picked.  I spent some time recently on my hands and knees clearing apples off the ground.  I managed to do some weeding while I was crawling around as well.  Once the ground was clear I spread lime and compost as the trees have not had a good feeding in who knows how long.  One of the ways I know this is because our apples suffer from Bitter Pit.  This is a condition caused by calcium deficiency.  Our apples appear pitted and brown spots occur in the flesh.  The lime and compost spread throughout the orchard will hopefully begin to alleviate this condition.

Many apples too high to reach fall to the ground and are damaged by bruising, bugs, slugs and birds.  It means a lot of clean up!
Another issue with our apple orchard is space.  Any fruit tree needs a combination of air and sun to grow large blemish free fruit.  Not enough air circulation or sunlight promotes conditions such as fungus and rot.  Many of the trees are planted tightly together and we have had a difficult time accessing the apples.  Often when we do find them they are quite small, deformed or bug ridden.  A decision was made to create a little more room and our orchard is now minus 3 trees.  It's funny but you hardly even notice they're gone.  The branches from the other trees simply relaxed into the open space and filled it right back up again.  Hopefully the removed trees will create a little more breathing room and ease up the competition for nutrients and light.

On the right you can see the stump from a former apple tree.  There was only a couple feet between that tree and its neighbour.
Things have slowed down in our orchard right now and we're getting a bit of a break but there's always another chore to be undertaken.  The next step will be pruning which we'll do mid-winter or early early spring when the trees are dormant.  In the meantime we're enjoying the fruits of our labour, slices of apple pie and cups of hot cider on a chilly evening.

Wednesday, November 10, 2010

My New Tool

It was my birthday a few months back and my dear mother-in-law gave me the best present.  A gift card to Lee Valley.  Lee Valley is a mail order and retail store that specializes in tools and accessories for woodworking, garden and hardware.  Everything from books and propagation supplies to shovels and fertilizer.  For me, looking through the Lee Valley catalogue is a little like a child being given the Christmas Wish catalogue.  I want one of everything.  So it took me some time to decide what I wanted for my birthday gift but I finally settled on the Compost Aerating Tool.

Normally I use a fork to turn my compost but it can be back breaking work and frankly doesn't do the best job.  The top layer tends to get turned over but the bottom never really gets touched.  The compost aerating tool looked like it might solve this problem.  It's basically a rod that you insert into the compost.  The tip of the rod is quite pointy so it's easy to insert.


When you pull the rod back out of the compost wings fold out and pull up the compost with it thus aerating the compost and mixing it up.


I had some reservations about ordering this tool as I was unsure how sturdy it would be.  The compost can get quite heavy and I worried this tool might bend or break or simply not be able to lift the mixture to my satisfaction.  Well, I'm pleased to report I was wrong.  When the tool came in the post I discovered it is made solely of steel and is coated so it won't rust.  It's exceptionally strong and sturdy and I was able to plunge it 4 feet deep into the compost without a worry.

The photo below shows the bin to be mixed.  You can see there are layers of apples, straw, sawdust and sod. These layers have settled quite a bit in the last month as well so there's quite a bit of weight there.


But within a few minutes it started to look like this.


So easy.  Just plunge the tool in and pull up.  I'm able to bring the compost right from the bottom of the pile and pull it to the top.  I'm smitten.

If there's an issue I have with this tool is that it's too strong.  Either that or I don't know my own strength.  My compost bin is lined with wire and I've found I have to be very careful not to plunge my new tool into this wire.  If you take a close look at the photo below you can see my mistake.


Serious oops.  I was attempting to get as close to the edge of the bin as possible but ended up plunging the aerator diagonally through the wire.  Because the wings fold out when you attempt to pull up I was unable to pull it back out the way it went in.  Wire cutters were necessary in the rescue attempt.

Despite the setback I'm still in love.  For $30 this thing has taken what used to be a pain in the arse kind of chore and turned it into a fun 15 minute job.  Exactly what a tool should do.  Make things easier.

Saturday, November 6, 2010

Triumphs and Tragedies

I wasn't going to post a T&T this week, blaming the weather for my laziness.  But after laying about on the couch for far too long this morning I finally committed to going outside for at least a half hour just to get my spirits up and energy going again.  Despite the wind and the rain I found a multitude of things to keep me busy and that half hour turned into 4 hours (although I was pretty soaked when I finally came in).  Here's what I found.


The straw that I mulched my vegetable garden beds with is sprouting!  One of the downsides I have heard about with using items like hay and straw for mulch is that they often carry seeds with them.  Well here's the proof.


Looks like I might have to weed my vegetable beds in the spring before planting.

I decided to take a last walk through the meadow before it becomes inaccessible due to snow and noticed numerous holes in the grass.


The mice have built their homes for the winter to keep them warm and cozy.


Also in the meadow the yarrow is still blooming despite frost and snow earlier this week.  Although I can't blame it.  I'd be confused too since the snowfall was followed by a high temperature of 18 degrees celcius.  That could almost be classified as a beach day! (except for all the rain that came with it of course)


The hydrangea however dried out long ago and has been left to sway in the wind.


An exciting find was this spirea.  I have yet to definitively identify this variety but I'm liking it more and more as I discovered today that it is full of fall colour.  Showing everything from yellow and blue green to a bright red.  I'm thinking about possibly moving this shrub to a better location next year where I can more fully enjoy it.

I hope everyone is enjoying their weekend wherever they are.  If you're starting to feel a little cooped up might I suggest a walk in the rain.

Tuesday, November 2, 2010

Trick or Treat

Yesterday somebody mentioned that s-- word.  You know the one.  The claim was that it snowed on Saturday.  October 30.  Not likely.  I was outside that day and it was darn cold but the only white flakes floating in the sky were pieces of ash coming from my chimney.  Nice try says I.  I'm not falling for any Halloween tricks.

This morning I opened the door to feed the outside kitties and saw this.  That's some incredibly thick frost....  Floating through the sky....  OH MY -------!


I don't know about you guys but I am so not ready for this.